Working with Nintex Workflows and SharePoint
Earlier this year, I started as a project manager / business analyst consultant on a SharePoint implementation project. We needed to transition over several sub-sites containing complex approval workflows from an older document sharing platform, and since InfoPath is being deprecated, we ended up going with Nintex O365 as our workflow add-on of choice for SharePoint 2013 Office 365.
The journey has been interesting, to say the least. Nintex behaves in very unexpected ways, and with our workflows being fairly complex, we’ve had to cross a lot of hurdles and come up with workarounds, hacks and a fair amount of research to solve these problems. The Nintex forums have also been a great resource and I’m including links to any helpful solutions posted there as well. I’m recording these below as a reference for myself and anyone else facing the same hurdles.
Linking multiple workflows
One of the workflow solutions I have been working on involves linking multiple workflows in sequence. The reason these had to be split was because of some rather complicated task assignment logic we’ve used in a couple of these workflows, and size limitations prevented us from combining all of these in one workflow. There are a couple of ways to achieve multiple workflows:
Option 1. Firing off all workflows simultaneously on item creation, but having the other workflows wait for a certain field to change.
This worked great for a couple of reasons - the transition from one workflow ending to the other workflow beginning was very short and seamless, and all workflows were launched with the same initial permissions.
But the problem was if the user had to restart the workflow for any reason. The user would have to remember to fire off all the workflows, in the right order, and even then the “wait for field change” didn’t always work.
Option 2. Linking one workflow to the next using the ‘Start workflow’ action.
I quite thought I had found the holy grail with this solution - I could even do conditional branches and fire off different workflows depending on whether particular fields had been filled. It did require me to put in an admin user ID and password into the workflow action that launches a separate workflow, and getting the configurations filled out just right took some research as well. For more information on how to configure the ‘Start workflow’ action, see article: Start a Workflow using NINTEX Workflow in SharePoint 2013 Online
However, it turned out that the workflows launched correctly, and in sequence, only as long as the initial request was submitted by my account, the one with site administrator rights. When a user with lower permissions (Edit or Contribute) initiated the workflows, the first workflow kicked off without any problems, but the next linked workflow would fail and get suspended with the following error message:
Retrying last request. Next attempt scheduled after (date/time).
Details of last request: HTTP NotFound to
https://siteurl/sites/subsite/web/lists(guid'xxxx')/Items(n)?
Correlation Id: xxxx Instance Id: xxxx

Item does not exist. It may have been deleted by another user.
I had encountered the ‘Item does not exist’ error before - it tended to appear when a user didn’t have access to view that particular item.
And since the workflows ran without problem when initiated from my account, I knew it had to be a permissions issue.
I went down the rabbit hole researching several possible solutions, all listed below including the final solution that works like a charm. Scroll down to #6 if you want the tl;dr.
Giving the user higher permissions
#1. Upgraded user permissions from Contribute to Edit - this didn’t work and gave me the same error message. Giving the user any higher permissions would result in users being able to see each others’ List items, which would contradict business requirements.
Giving the user higher permissions temporarily
#2. Considered elevating user permissions on the SharePoint List temporarily while one workflow transitions to the other, per this article Set Item Permissions - Start Workflow Issue but it was a risky move to add more permissions temporarily since if anything failed, the user would basically see everyone else’s requests and this was a no-no.
Giving the workflow higher permissions
I found a series of articles on using elevated workflow permissions to remedy the issue.
#3. One of the articles, Workflow App Permissions suggested tricking SharePoint into thinking of the workflow as an App (i.e. a functioning widget or add-in like a Document Library or a List). This was an interesting approach, and definitely worth a try, until I found…
#4. An article on using an App Step, a Nintex feature that can leverage higher permissions than the rest of the workflow, per this article We use Nintex online with SharePoint 2013…, and this Nintex O365 documentation article for App Step.
I added an App Step to my workflow and when I clicked into the action to configure it, was greeted with this message.
The required feature is not currently active.

To enable App Step, the following site feature must be activated:
Workflows can use app permissions
#5. The Nintex App Step documentation linked above also led to a SharePoint Dev center artice on how to Create a workflow with elevated permissions by using the SharePoint 2013 Workflow platform. This article in conjunction with another helpful article How to enable usage of App Step led me to the Site setting that allows workflows to use app permissions.
While setting up an App Step seemed like the best solution of all of the above, it still felt like a lot of added weight to the workflow. I wondered for a moment if simply enabling this setting might allow the workflow to run with elevated permissions, and this was certainly worth a try.
#6. (SOLUTION THAT WORKED) So, I went into Site Settings > Site Actions > Manage site features:

And enabled the ‘Workflows can use app permissions’ setting.

I tentatively kicked off a workflow from a test user account with lower permissions, and …. it worked!
However, kicking off a new workflow from an existing workflow seems to take Nintex a good 15-20 minutes to slowly work its way through. This can be fairly awkward during live demo sessions, but shouldn’t be a problem during normal live usage.
Hiding the Task Outcome field
Within the Nintex workflow, we are able to set up task assignments that have one of several outcomes (Approve / Reject / On Hold etc). These task outcome options show up as a visible radio-button field on the custom task form that can be created for the approvers. This field refuses to elegantly hide or be switched off in any way - in fact, it’s a requirement that the field be enabled/rendered on the form for the approvers to successfully select an outcome. For the longest time, we’d keep tucking this outcome field behind other fields, or behind an empty white square graphic and it would still manage to peek through.
Until, a colleague of mine found this hack online that leveraged the Control-CSS field and some simple jquery to make the field invisible.
In the Control CSS field associated with the Task Outcome choice control, put in a unique class name.
Control CSS = hidden-control
Switch over to the Form Settings, and in the Custom Javascript field, add in the following jquery snippet.
NWF$(".hidden-control").hide();
Hiding or disabling fields by SharePoint Group membership
Nintex has a neat function called fn-IsMemberOfGroup() that checks if the user currently looking at the form is a part of a particular SharePoint group.
The trick here is to make sure you manually type in the name of the group and enclose in quotation marks. If you copy-paste the name of the SharePoint group, especially from SharePoint, it seems to carry some artifacts that Nintex dislikes and the hide/disable based on SharePoint group functionality refuses to work.
See articles: fn-IsMemberOfGroup(“Task Team”) not working in Nintex Forms O365 and fn-not not working
Date/Time Format Strings
A couple of handy reference articles on using inline functions Date and Time Format Strings - Quick Reference Guide or the default options available in a ‘Set Variable’ action Using the Format this Value Feature with Dates to format dates.
Checking for an empty Person field
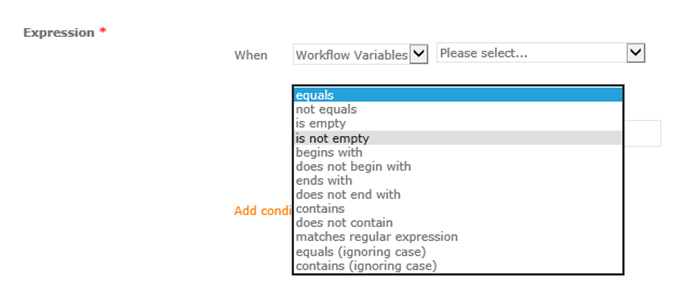
This turns out to be more complicated than it seems. One would think that a simple check for Is this field blank ought to do it, but the Run If and Conditional If actions don’t contain a is blank / is not blank check for List Lookup columns; the only options available are equals and not equals.

The trick, as described in this Nintex post Check for empty person field in workflow is to instead save the Person field as a string field in a Workflow Variable. Once this field is available as a workflow variable, the Run If action does have an is not empty check.
Regular Expressions in Nintex
It’s completely amazing that Nintex allows RegEx parsing. That’s powerful stuff, and it enables you to do a lot with just a static text field. I ran into having to use this to extract an internal reference number from a text string.
This reference number was always preceded by a hashtag ‘#’ symbol, which made things easier, but it wasn’t always in a constant position and could be varying lengths, so I couldn’t use the substring action available in Nintex. It was however the first set of consecutive numbers in that string, which is a useful piece of information for leveraging RegEx.
To start with, the Nintex documentation on using Regular Expressions was pretty helpful: Nintex Actions > Regular Expressions
The goal was, for example, to parse the number 543 from the string “#543 Test List Item with additional descriptors and possible more numbers 93940”.
The actions required were as follows:
- This Regex expression successfully extracts all the number sequences and stores them in a collection:
^#([\d]+)? - Since we want just the first iteration of this expression, we use the Nintex action to retrieve just the first item in the collection
- The ‘#’ symbol is still stuck to the first expression, so we do a substring-replace action to remove the # and we now have the pure number code from the list item description.
Stay tuned for more notes..

Arti Annaswamy
Data analytics, process improvement, project management, coffee drinking